Greg Cordover
Thoughts & projects
Acetone Smoothing 3D Printed Parts
A major inconvenience of 3D prints is trying to make them look better after they’re printed.
Most consumer 3D printers work by melting and extruding filament into a thin line of plastic and moving the print head relative to a bed to create shapes. This process is known as FDM. While this process is relatively cheap and easy, the motion and layers often result in defects and often result in visible layers. The other common type of printer uses a resin cured by a special light. These usually are far more smooth as they pull up the object while changing what areas are cured. They also don’t rely on motion for what goes on each layer so they can be much more detailed. Unfortunately this resin is usually toxic until cured and much more expensive than FDM filament.
Thankfully there are some ways to post-process these printed parts.
You can sand many of the plastics very well. If you have large, flat-ish areas, you can use an electric sander to speed things up. However small or extremely detailed areas are nearly impossible to sand with electric sanders, or sometimes even by hand. A large, detailed object would take an unreasonably long time to sand to a level that looked professional. To continue cleaning it up you would have to paint it.
In order to paint a print, you need to first prime it. After priming it, spray paints stick well and apply evenly enough to make a high quality product. Even this can be a hassle to perform though. You’d have to acquire the primer and paint and find somewhere that would be safe to spray paint. This isn’t something you could just do for any print, it’d require too much time. Fortunately there’s an alternative to this.
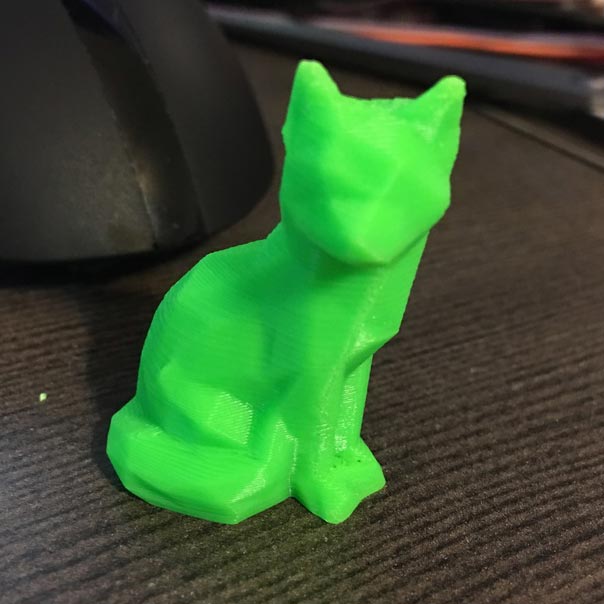
This was a quick fifty minute print at a medium print quality. You can clearly see each layer, sharp step-offs around rounded edges, and a few holes.
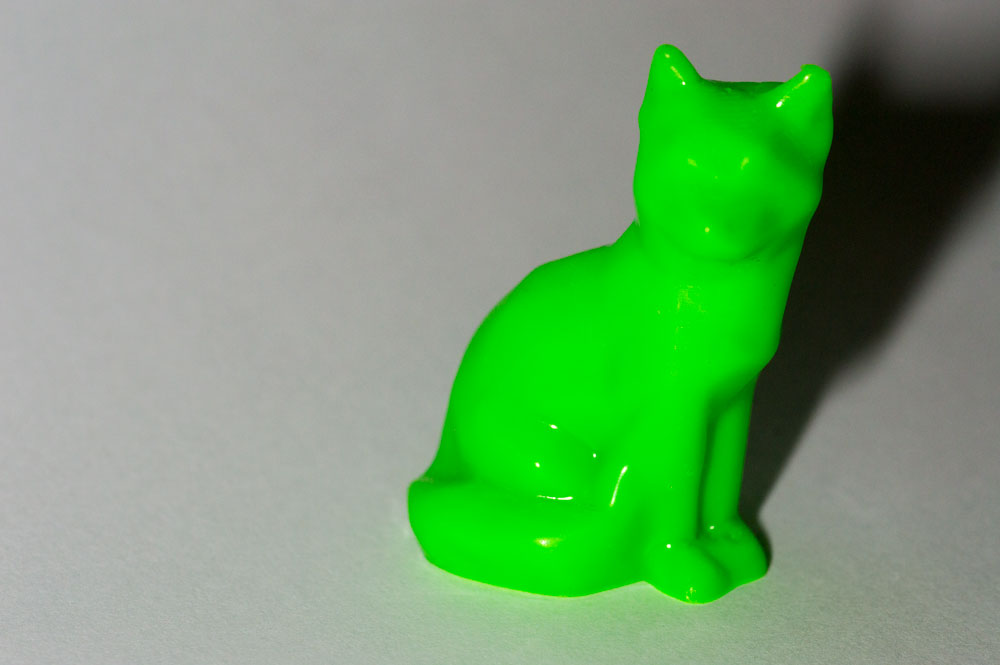
Now, here it is beautiful. No visible layers. No sharp edges. No holes. A glossy surface finish. It feels smooth. It doesn’t look like it was 3D printed. And this took almost no work to accomplish.
This is thanks to an acetone soluble material called ABS. Using this property, we can smooth the surface by just exposing the surface to acetone vapor. All you have to do is place the object on a platform of some kind, pour in a small amount of acetone, and heat the container. After a few minutes, the acetone melts the outside edges of the print and the surface tension draws the material together into a glossy and smooth finish. Regular prints aren’t food safe because of micropores that can harbor bacteria. This process smooths the surface enough to remove those pores and results in items that are essentially food safe. I can guarentee the FDA won’t be approving any 3D printed objects soon though.
I placed my model on an old aluminum heatsink I had because I knew it wouldn’t react to the acetone or the heat and put it in a glass jar. I placed the jar on my 3D printer’s bed and heated it up to around 90°C. After about five minutes, it was smooth enough and I removed it. As the acetone was still working its way into the model even after removing it, it couldn’t be touched for a few minutes after it is removed. It remained soft for a few hours afterwards.
From here you could still prime and paint it. For a quick print that’s already in an acceptable color, I didn’t want to do any time intensive work.
Of course, there’s a downside to this process. You have to use ABS plastic. ABS is a very common material used in many day to day objects. However, it is more difficult to print certain types of objects than the other common filament type, PLA. ABS tends to warp more when printing large objects than PLA does. It also requires hotter temperatures and smells a lot stronger than PLA. It’s not entirely clear if the additional particulate matter ABS creates while printing is safe, so you’re required to print in a more well ventilated area. ABS does has other advantages. It’s much less likely to warp in direct sunlight. It’s stronger for certain situations. It’s more flexible. However flexibility could be a downside for certain applications, such as if a part was required to be an exact shape and not bend. They are both roughly the same price, so a lot of it comes down to personal preference.
If you absolutely needed to smooth PLA, you’d have to use something like chloroform. This chemical is far more dangerous than acetone. I don’t have a good enough reason to risk working with it.
This was a fun experience to look into the ways of finishing prints. I purchased my first roll of ABS filament to try the acetone smoothing process. The model above was the third object I had tried to smooth. It’s very easy and relatively safe. In the future I’ll certainly buy more ABS filament, but right now I still have 4 kg of PLA filament left.
Fox model from Thingiverse